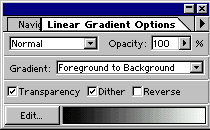
Let's run through the features of this tool. The Normal drop-down box allows you to select a blending mode for your gradient; the default, Normal, replaces whatever was underneath with the new gradient, but try playing with different options for different effects. The Opacity slider determines how much of the original image will show through the gradient after it is applied.
The Gradient box contains a list of 16 preset gradients, and you can add your own gradients to the list.
Mask controls whether the transparency mask for the gradient will be used. Some gradients are partially transparent (e.g. the Transparent Rainbow and Transparent Stripes presets), but deselecting Mask will make those gradients completely opaque.
Dither creates a smoother gradient effect by dithering the gradient to reduce colour banding (noticeable on big images with low colour depths).
Reverse swaps round the start and end colours of the gradient. This isn't reflected in the gradient in the dialog, but it takes effect when you actually apply the gradient.
Filling with a gradient
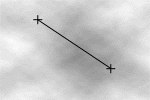
So how do you actually use a gradient? Simple. After selecting your options from the palette above, simply drag in a document window to mark the start and end points of your gradient. When you release the mouse button, the gradient will be drawn onto the current layer:
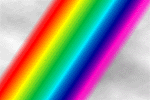
Here we used the Transparent Rainbow gradient, which means that the edges of the gradient are transparent. If you use most of the other gradients, you will notice that they fill the whole layer. You can prevent this by making a selection first; then the gradient will only fill the selection.
Making a new gradient
Let's create a new gradient. Click on the Edit... button in the "Gradient Tool Options" palette to bring up the Gradient Editor. From the list at the top select the Red, Green gradient:
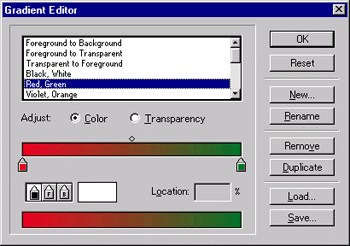
Let's make a copy of this gradient and modify it to include the colour blue as well. Select Duplicate and enter Red, Green, Blue in the Gradient Name box.
See the green square, just below the red/green gradient strip, on the right? It has a triangle above it, pointing up towards the gradient strip. Drag this square to the centre of the strip - the triangle turns black to show that this colour is being edited:
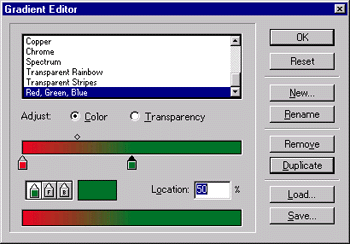
Now click below the strip on the right hand side, where the green square was before you dragged it. Another green square appears! You can have up to 32 of these colour stops on the strip. The gradient will move smoothly from one colour stop to the next.
Drag this new square to the right until the Location box below it says 100%. Then click on the green rectangle to the left of Location and pick a blue colour (e.g. R=0, G=0, B=255).
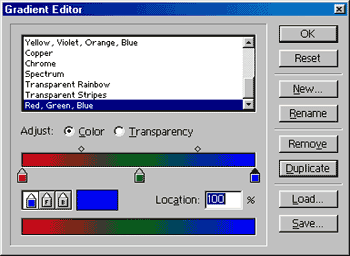
Congratulations! You've made a new gradient. Try playing with the other settings in the Gradient Editor. The F and B buttons turn the current colour stop into the current foreground or background colour. This means that the gradients will depend on the user's current colour settings. Also, the diamonds above the colour strip mark the midpoints between pairs of colour stops. You can drag these midpoints around to ease in or ease out the gradient flow between the stops.
Finally, as we mentioned previously, you can make parts of the gradient transparent. Click on the Transparency radio button next to Adjust: to modify the transparency settings. Here you have colour stops exactly as before, but each stop has an opacity rather than a colour. This way you can make gradients of transparency which allow parts of the original image to show through.
3D fun with gradients!
Now that you know the basics of the Gradient tool, let's look at a couple of practical uses.
Let's make a very easy 3D button. Drag out a rectangle with the selection tool, pick a gradient (e.g. Black, White), and drag out a linear gradient from the bottom-right to the top-left:

Now contract the selection by 4 pixels ( Select > Modify > Contract...) and feather it with a radius of 2 pixels ( Select > Feather... ). Finally, drag a new gradient from the top-left to the bottom-right:

There we have it - a quick and easy 3D button. Nice! :)
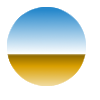
Now let's make a 3D sphere.
Create a new document, make a new layer, and drag out a circle with the Ellipse selection tool (hold down the Shift key to constrain the selection to a circle). Then click on the Default Colours icon ( ![]() ), or press Shift+D, to reset your colours to black and white. Flip the colours using the
), or press Shift+D, to reset your colours to black and white. Flip the colours using the ![]() icon, so that your foreground colour is white and your background colour is black.
icon, so that your foreground colour is white and your background colour is black.
Click and hold the mouse on the Linear Gradient tool icon in the Tools palette, and a row of alternative gradient styles will pop up. Select the icon to the right of Linear Gradient. This is the Radial Gradient tool.
Select the Foreground to Background gradient in the Gradient tool options palette. Now drag a gradient in your circular selection. Start it from near the top-left of the circle, and drag it down to the bottom right at a 45 degree angle (you can use the Shift key to constrain the line to 45 degree angles). Voilà - an instant sphere!

You'll probably want to add a drop-shadow to make the sphere stand out from the background:

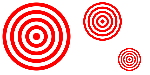
Bullseye!
Here's a really simple way to make a target using gradients. Create a new image and make a new layer on it. Select the Radial Gradient tool and choose the Transparent Stripes gradient. Pick a suitable foreground colour (e.g. red). Now drag in your new layer to make a target!
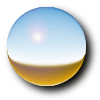
Captivating chrome
The built-in "Chrome" gradient is great for making that chrome-object-in-a-desert look.
Let's try making a chrome sphere. Make a circular selection like you did for the sphere above, then fill it with a linear Chrome gradient. Start near the top of the circle and drag below the bottom, so that the "horizon" is below the centre of the sphere:
Now use the Spherize filter (Filter > Distort > Spherize...) a couple of times to bend the "horizon" into a spherical shape:

You can add a highlight to this "sphere" by creating a layer above it, making a sphere in that layer using the Black, White radial gradient like we did earlier, and selecting a blending mode of Lighten for that layer. A drop shadow completes the effect:
No comments:
Post a Comment