By Matt Doyle. Level: Intermediate. Published on 16 August 2001 in Photoshop.
Learn how to create cool metallic logos and shapes with this Photoshop 5.5/6 tutorial.

In this tutorial we'll look at using some of Photoshop's tools to produce realistic brushed-metal effects. You can easily apply these effects to text or to other objects such as geometric shapes and interface bars.
Get selected
The first thing we need is a selection to work on. The shape of the selection will determine the shape of our final metallic "object". You can use a selection created from a path, a selection based on a mask, or any other selection you can dream up! In this example, we're going to use a text selection to create some brushed metal text.
To create the text selection in Photoshop 5.5, click and hold on the Type tool icon in the Tools palette until the little palette pops up, then select the dotted T (also known as the Type Mask tool):

To create that selection in Photoshop 6, select the Type option in the Tools palette. You'll see that the Options bar at the top of your screen changes to reflect the type options. Towards the left of the bar, select the "dotted T" option ("create a mask or selection").
Then create a new blank document, and create a new layer for the text. Next, click with the mouse in the document where you'd like your text to appear, and type the text in a suitable font (how about a nice chunky one!):
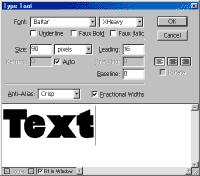
Click the OK button, and you'll see your text appear as a selection in the document:

Adding the metal effect
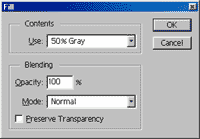
Now that we have a selection to work with, let's turn it into metal! First we need a solid block of colour to work from, so with your new layer highlighted and the text selection still active, select the Fill option from the Edit menu and fill the selection with 50% gray:
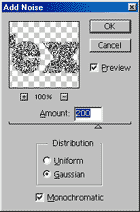
Next we'll add some noise to our text, which will be the basis of the "streaks" in the brushed metal effect. Select Filter > Noise > Add Noise... and choose an amount of around 200. Make sure you select Gaussian distribution, and check the Monochromatic box to create black and white noise:
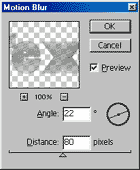
Now we'll turn those dots into streaks! Select Filter > Blur > Motion Blur. Pick a distance of around 80 pixels. You can vary the angle from the default of 0 to create the streaks in the direction you prefer:
You should now have a "brushed" effect to your object as follows:

You've probably noticed that the text has turned slightly transparent - we can see the background showing through. This is caused by the Motion Blur filter. But we want our object to be solid metal, not see-through! Let's fix this.
Select Edit > Fill again, but this time, choose Behind from the Mode drop-down list. As before, select 50% Gray:
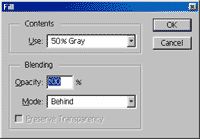
This will "fill in" the transparent areas in our layer as follows:

Time to chunkify!
Our object is looking quite metallic now, but to really give it a 3-D "lump of metal" feel, we need some bevelling and outlining. We can easily add these effects in Photoshop 5.5 using Effects (in Photoshop 6 and later you can achieve the same results using Layer Styles).
To apply the appropriate effects to our object, first remove our selection (we no longer need it) by pressing Control+D. Then, if you're using Photoshop 5.5, select Layer > Effects > Bevel and Emboss.... We want quite a chunky effect, so whack up both Opacity values to 100% and choose a Depth of 6 pixels and a Blur of 5 pixels.
In Photoshop 6, go to Layer > Layer Styles > Bevel and Emboss. For these purposes, you probably want the Depth set to around 100%, the Size set at around 5 pixels and the Soften control set to zero. You can leave all the shading controls at default values, but have a play if you like!
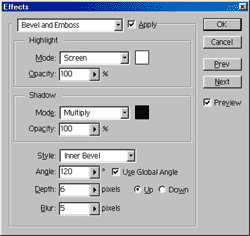
To give the edges of our object a bit more definition, let's add a black outline. We can do this using the Outer Glow effect. In Photoshop 5.5, select Layer > Effects > Outer Glow, choose black for the glow colour (by clicking on the colour box and entering 000000 in the # box at the bottom), choose Normal for the Mode, and set Blur to 1 pixel and Intensity to about 50%.
In Photoshop 6, go to Layer > Layer Styles > Outer Glow. Within "Structure", set the Blend Mode to Normal, Opacity to around 65%, Noise to zero and the colour to black (the gradient should be black to transparent). Within "Elements", set the Technique to Softer, Spread to around 5%, and the Size to around 3 pixels. Experiment with this to your heart's content! You can leave Quality alone.
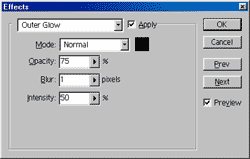
Finally, add a drop shadow to the object to give it more depth. In Photoshop 5.5, select Layer > Effects > Drop Shadow... (the default values will probably do fine). In Photoshop 6 use Layer > Layer Styles > Drop Shadow and try these settings: Blend mode: Normal, Opacity: 75%, Distance: 5 pixels, Spread at zero and Size: 5 pixels. Again you can leave Quality alone. We've now got a nice metallic-looking object!

To add more interest, try experimenting with a lens flare or two (Filter > Render > Lens Flare...). This example used a "105mm Prime" lens type:

You could also have a go at adjusting the tint using Image > Adjust > Hue/Saturation (check the Colorize box), and use Image > Adjust > Curves to bring out the highlights and contrast in the object, as we've done in the example at the top of the page. Have fun!
No comments:
Post a Comment