By Matt Doyle. Published on 3 April 2007 in Photoshop.
What new goodies await us in Photoshop CS3? Matt reviews the features and enhancements that Adobe have added to this industry-standard image editor. Is it worth the upgrade? Read on and find out!
If you're a professional Web designer, chances are that you've used Photoshop at least once in your life. This impressive application, nearly 20 years old, is very much the industry standard for image editing and photo retouching, and is often the software of choice for the Web designer too.
The latest incarnation - Photoshop 10, or CS3 - is just around the corner; Adobe officially launched it last week, and it's currently available for pre-order at the time of writing.
We've been playing with the CS3 beta for the last few months, and it's certainly an impressive beast. Let's take a look at the new, fun stuff that Adobe have added to their latest release, as well as areas that they've improved over CS2 and earlier versions.
New features
Although the new feature list for CS3 isn't quite as lengthy as CS2 was, there are quite a few radical changes in there - a redesigned interface, the wonderful Auto-Align Layers command, and the clamoured-for Smart Filters, to name but a few. Let's explore all these new features.
Brand new streamlined interface
The first thing you notice when firing up CS3 is the new user interface. For one thing, the toolbox has been slimmed down to a single column of buttons, rather than the pre-CS3 two-column design. This allows you to keep the toolbox out of the way on the side of your screen - great for freeing up horizontal space. You can easily flip back to the two-column version by clicking the double arrow at the top of the toolbox window.
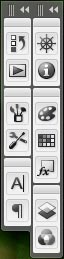
Speaking of slimming down, Adobe have really gone to town with the palettes. The new collapsible palette docks let you reduce all your palettes down to tiny icons when you're not using them - see the screenshot on the right - which is a wonderful space saver. It takes a while to memorise the icons, but once you do you'll be flipping between palettes in no time. You can keep your commonly-used palettes, such as the Layers palette, open all the time, and collapse the rest to icons until you need them, freeing up more space to work on your images. However, if you prefer the old style interface, you can always drag your palettes out of the dock, and have them floating free again.
There's also a new Maximized Screen Mode - available by clicking the icon at the bottom of the toolbox, or by pressing F - that expands the document window to fill the available screen space between your toolbox and palette docks.
Universal Mac application and speed improvements
At last, with the release of CS3, Photoshop becomes a Universal Mac application, allowing it to run at native speeds on the new(ish) Intel Macs. In fact CS3 is generally zippier than CS2 was, with brushes and filters feeling that much more responsive than in CS2; the application is much quicker to launch too. It's nice to know that more features don't always mean more code bloat!
Smart filters
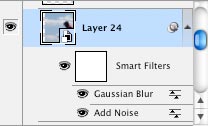
This has to be Photoshop's number one requested feature: "live" filters that you can go back and edit on the fly. These types of filters have been available for a long time in other image editing software, and it's great to see them make their Photoshop début in CS3.
They're a tad clunky to use, it must be said - you have to convert your layer to a smart object before you can apply a smart filter to it - but it's a welcome addition nonetheless. In use, smart filters behave much like layer effects in the Layers palette, as you can see in the screenshot. You can reorder the filters by dragging them in the Layers palette; this lets you control the order that the filters are applied in.
You can also set a blending mode for each filter, which is a really powerful feature.
Quick Selection tool
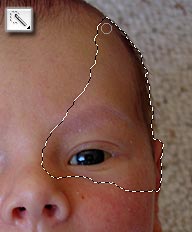
CS3's new, super-easy Quick Selection tool is like the Magic Wand tool on steroids. Rather than carefully clicking areas of your image to select them, like you do with the Magic Wand, you just casually "paint" around the edges of your selection using a brush size of your choosing. Photoshop then automatically selects the object you're "painting" on as it goes.
It's incredibly quick to use, and Photoshop often gets the selection border spot-on. If it gets a bit carried away, you can of course paint with Alt/Option held down to remove areas of the selection, or use the fabulous Refine Edge command. Speaking of which...
Refine Edge command
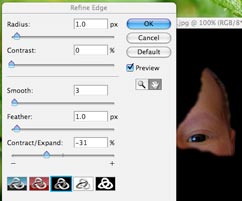
Refine Edge groups most of the commands available under Select>Modify, such as Smooth, Feather and Expand/Contract, into one handy dialog. This is great, because you can now fine-tune your selection all in one place and preview the results as you go. It works with any selection, whether made with a selection tool, or created via the Quick Mask.
Auto-Align and Auto-Blend Layers
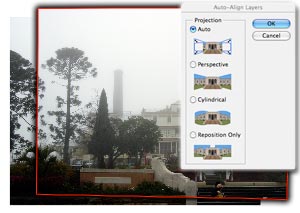
The wonderful new Auto-Align Layers command automatically lines up several different photos of the same scene, even if the photos were taken from different angles. It's almost like a non-panoramic version of the Photomerge command.
For example, say you've taken three photos of the same scene, but with different people in. Simply stack the three photo layers on top of each other, select them, then run Auto-Align Layers. Photoshop rotates, squeezes and distorts the photos so that they all line up with each other. You can then copy and paste the people from the different photos into the one final image.
This is a pretty powerful feature, and it nearly always does a great job at aligning the images. It works best if your photos were taken at nearly the same angle though, and even then it sometimes gets it wrong. If in doubt, use a tripod!
Auto-Blend Layers, the perfect complement to Auto-Align Layers, adjusts the brightness levels of the aligned layers so that they're consistent, and also creates layer masks for the layers to mask off the ragged edges, leaving you with a nice square finished photo. Of course, because the layers stay as layers, you can still edit the individual photos if you wish.
Speaking of Photomerge, this stitching command - first built into Photoshop CS - has seen a major overhaul in CS3. The Auto-Align Layers technology is now integrated, which produces a much better result than in previous versions. It's even a fully automatic process now, though you can still go in and tweak the panorama manually if you like.
Black & White adjustment
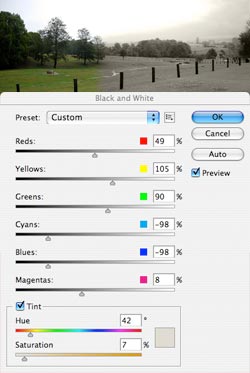
Another oft-requested feature, the new Black & White adjustment command - also available as a new adjustment layer - lets you produce great black & white conversions of colour photos.
Although you've always been able to convert a photo to black & white simply by choosing Image > Mode > Grayscale or Image > Adjustments > Desaturate, these commands do a pretty poor job of it. This is because they don't give you any control over the conversion process.
For years, photographers have got around this by using various tricks, such as gradient maps, multiple hue/saturation adjustment layers and all sorts of other voodoo. The Channel Mixer adjustment has arguably been the most useful of the bunch; enable the Monochrome option and you can control the amount of red, green and blue that goes into the final black & white image.
The new Black & White adjustment builds on this by giving you six sliders: Reds, Yellows, Greens, Cyans, Blues and Magentas. This gives you much greater control over the mix of colours that makes it into the final image. It's also more forgiving than the Channel Mixer; the values don't have to add up to 100%, and it's much harder to clip your shadows or highlights. (Speaking of which, Adobe have thrown in a Total display in the Channel Mixer dialog, so you can check that your channels add up to 100% without getting your calculator out.)
It's an improvement in other ways, too. There's an Auto button that sets the six sliders to produce the best mix (from Photoshop's point of view, of course), and there's also a range of built-in presets to simulate various lens filters. Finally, you can add a tint - for example, a sepia tone - to the end result. This seems to produce a much nicer effect than messing around with a Hue/Saturation adjustment after the fact.
Exposure adjustment layer
It's a small change, but worth mentioning anyway: If you're a fan of using the Exposure adjustment command to correct in-camera exposure problems, you'll be cheered to know that Exposure is now also available as a non-destructive adjustment layer in CS3.
New blending modes
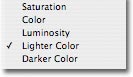
Another minor change in CS3 is the addition of two new blending modes: Lighter Color and Darker Color. They're simply composite versions of the existing Lighten and Darken modes.
In English, this means that they work by comparing the overall brightness levels of the two layers, rather than working on a per-colour-channel basis. Their effect, as you might imagine, is similar to Lighten and Darken but, because they don't affect the colour channels separately, they preserve the original colours in the layers.
Device Central
Device Central is a new satellite program that ships with CS3. It's designed to help you create content for mobile devices, such as phones and PDAs. You choose the device you want to create for, then Photoshop gives you a template document to use that's the right size for the device's screen. You can then preview your work on a virtual version of the device, by clicking the Device Central button in the Save for Web & Devices dialog (see below). You can also create and preview Flash, video and Web content.
It's very much beta at this stage though - it only contains generic devices rather than specific makes and models - but it'll be interesting to see how this looks in the final release.
Export to Zoomify
CS2 featured an option to export large megapixel images to a Web viewer called Viewpoint ZoomView, which lets you quickly zoom in and out of large images and pan around, Google Maps-style.
With the advent of CS3, Adobe have eschewed ZoomView in favour of Zoomify, which basically does the same thing, albeit without some of the advanced features of ZoomView. However, Zoomify works with the standard Flash browser plugin, so it doesn't need a separate plugin like ZoomView does. A big plus.
Improvements to current features
As if all those new CS3 features weren't enough, those clever-clogs at Adobe have been working hard to improve existing Photoshop functionality too.
Save for Web
The trusty Save for Web command now has the tongue-twisting name of Save for Web & Devices. It's very similar to the CS2 Save for Web, but the Edit in ImageReady button in the bottom corner of the dialog has been replaced with the Device Central button for previewing your image on an emulated device.
So why no ImageReady button? Simple: ImageReady is no more! It's gone to software heaven. The more useful ImageReady features - animation, slices and so on - have been absorbed into Photoshop itself; other features, such as image maps, have been dropped. Personally I think this is a great thing - it was always a bit cumbersome constantly flipping between Photoshop and ImageReady to do stuff like animated GIFs (which, let's face it, aren't as popular as they used to be anyway).
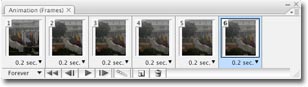
The dialog also contains controls for previewing an animated GIF and choosing repeat options. You now create the actual animation directly in Photoshop, using the Animation palette (Window > Animation, shown to the right). The old ImageReady features are all there, such as setting frame delays and adding tweened frames.
Cunning cloning
Many of the cloning tools, such as the Clone Stamp and Healing Brush tools, now let you preview what you're doing before you do it. To do this, hold down Shift+Alt (Win) or Shift+Option (Mac); an overlay appears, showing you what's directly under the mouse cursor. This is wonderful for avoiding those cloning accidents - I'm forever cloning a feature of the image that I didn't want to clone!
You can also now sample from the current layer combined with all layers below, rather than simply all layers, by choosing Current & Below for the Sample option in the options bar. You can also choose to ignore the effects of any adjustment layers when sampling - to do this, click the appropriate icon in the options bar.
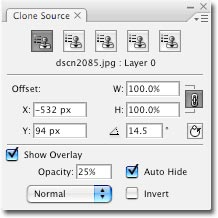
Finally, there's a new Clone Source palette available (Window > Clone Source) that lets you store up to five different sample sources - from different images if you like - as well as scale and rotate the sampled pixels before cloning them. This is fantastic if you have a perfect area of the image to clone from, but it's at the wrong angle or size. You can also control the preview overlay from this dialog, including its opacity and blending mode.
Eyedropper tool
The Eyedropper tool, used for sampling colours from a document, has had a small update: you can now sample bigger ranges than 5 by 5. Much more useful in the day of 20 megapixel images!
Vanishing Point
Adobe have improved the incredibly handy Vanishing Point command, first introduced in CS2, with a couple of great new features.
Firstly, you can now Alt/Option+drag a resize handle on a plane to rotate that plane about any angle relative to its neighbour. In other words, you're no longer restricted to creating planes that are perpendicular to one another. This gives you a lot more flexibility and control over the types of perspective shapes you can create.
Secondly, whereas the CS2 Vanishing Point limited you to moving your selection over one plane at a time, in CS3 you can stretch your selected image over multiple planes; the image hugs the contours of each plane, twisting and turning as it goes. Perfect for making package mock-ups and so on.
Curves
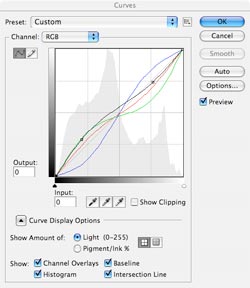
The Curves adjustment dialog has had a bit of an overhaul. If you modify the curves of individual colour channels - great for correcting colour casts - you can now see the individual channel curves superimposed on top of the composite curve. This means you can see the whole adjustment on the one graph, which is handy.
Adobe have also added a histogram, as well as black and white point sliders below the graph, meaning that you can now easily do Levels-type adjustments within the Curves dialog.
Other useful additions include some great built-in presets for various colour correction scenarios, and a more obvious way of switching between brightness levels and ink levels. You can also view which parts of your image you're clipping, much like Alt/Option-dragging the sliders in Levels dialog. Finally, there's no longer a button to expand the size of the dialog - it's permanently "expanded" now. This seems like a good move; the old smaller Curves dialog always felt a bit cramped anyway.
Brightness/Contrast
Let's face it - the Brightness/Contrast adjustment has never exactly been the professional's tool of choice. With its somewhat "rough and ready" approach, and its enthusiasm for clipping images, posterising and destroying shadows and highlights, it's generally been relegated to the "special effects" department.
Adobe have addressed this with the new Brightness/Contrast; it's now much tamer. Brightness now adjusts the spread of the brightness levels across the shadows, midtones and highlights; it's a bit like using the gray point slider in Levels. Contrast adjusts the contrast across the midrange - the equivalent of using an S-curve or inverted S-curve in the Curves dialog. It's much harder to clip your image now. If you're really keen to muck up your image though, you can always check the Use Legacy option in the dialog to return to the old-school method.
Camera Raw
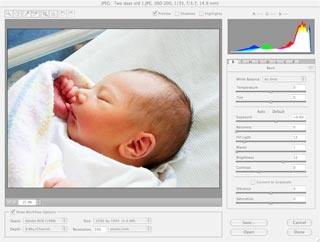
The Adobe Camera Raw plugin lets you open raw, unprocessed image files from many digital cameras - they're the digital equivalent of a film negative, in many ways - then process them, adjusting white balance, exposure, sharpening and so on, before opening them in Photoshop proper.
In CS3, Camera Raw has seen some major improvements. The most significant is probably that you can now open regular JPEG and TIFF files and process them in Camera Raw. Other welcome additions are the Recovery slider - for clawing back blown highlights created by dragging the Exposure slider - and the wonderful Fill Light slider, which is just great for adding punch to the lower midtones of an image.
Adobe have also overhauled the user interface, with more intuitive grouping of the sliders, and introduced a couple of new tabs, such as the HSL/Grayscale tab, which lets you control hue, saturation and luminance across eight colour ranges, as well as perform a black and white conversion right in the dialog. There's also the Split Toning tab, for adding a touch of colour to your shadows or highlights.
If you want to perform really precise, detailed adjustments to your images - whether they're raw files, JPEGs or TIFFs - the new Camera Raw is definitely the way to go.
Slightly better HDR support
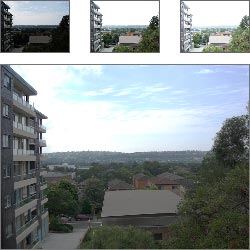
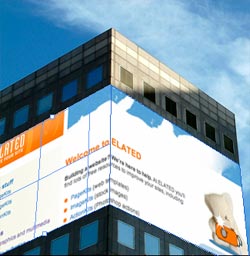
High Dynamic Range, or HDR images contain a much wider range of brightness levels than standard images, allowing you to capture both your dark shadows and bright highlights without clipping. Usually this is done by taking multiple photos at different exposure settings - known as bracketing - then using Photoshop's Merge to HDR command (File > Automate > Merge to HDR) to merge the photos together into one HDR image.
CS3 features some minor improvements on the HDR front. Its Merge to HDR command lets you load and save camera response curves for later use, and it also uses the new alignment function from Auto-Align Layers to better align the photos. Having said that, it did a pretty bad alignment job when I tried it on a test image (shown here). It aligned the clouds in the image fine, but - presumably because the clouds moved between shots - the rest of the image was all out of alignment. CS2 was actually better in this regard! Hopefully things will improve in CS3 final.
In addition, more functions within Photoshop now support 32-bit HDR images, such as the Levels and Hue/Saturation adjustments, and the Emboss filter. It's still quite a limited range, though - hopefully HDR support will improve in future versions of Photoshop.
Better PDF handling
Adobe have made a small enhancement to the way Photoshop opens PDF files: You can now specify an exact width and height when importing a PDF page, rather than just specifying the resolution.
Improved printing
Printing from CS3 is now much simpler, with a single Print dialog handling both previewing and printing itself. The print preview window is also bigger, and Photoshop now integrates more tightly with certain printers.
Adobe Bridge
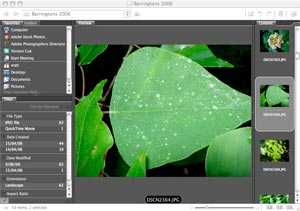
Adobe's Bridge software, bundled with Photoshop, lets you view, manage and organize your images, Photoshop documents and other graphics files. The latest version sports a new, snazzy-looking dark grey look - you can change the colour if it doesn't appeal - and various other improvements to the interface. For example, there's a wider range of views to change from, including a vertical filmstrip, and a Light Table view.
The new Bridge also features a Filter pane, letting you filter by an impressive range of criteria, including landscape or portrait orientation, and even aspect ratio. Another nice touch is the ability to group selected images together in a stack, for easier organisation. The new slideshow view is quite snazzy too, with Ken Burns-style sliding of images - though frankly it made me a bit queasy after a while!
So is it worth the upgrade?
CS3 offers some pretty nice improvements over CS2. Smart filters are a long-awaited feature and, while they're not the smoothest of things to use, the fact that we finally have non-destructive filters in Photoshop is a big plus. The Quick Selection tool is wonderful and really speeds up that initial selection process, while Auto-Align Layers will doubtless open up a whole new world of possibilities for photographers.
Speaking of photographers, this group will also appreciate the greater processing flexibility that the new Camera Raw offers, as well as the new Black & White adjustment.
From a Web designer's point of view, it's nice to see ImageReady-like features finally being incorporated into Photoshop, although this will no doubt infuriate the photo-manipulation purists.
It would have been nice to see bigger improvements in some areas - particularly HDR image handling - but overall this seems like a worthwhile upgrade across the board. And of course, if you run an Intel Mac like me, the upgrade's a no-brainer!
http://www.elated.com/articles/new-features-in-photoshop-cs3/
No comments:
Post a Comment