By Matt Doyle. Level: Intermediate. Published on 1 January 1998 in Photoshop.
Here we take you through the process of creating some cool 3D graphic effects in Photoshop using the "Lighting Effects" filter.
The Photoshop Lighting Effects filter is one of the most powerful filters built into Photoshop. With it you can create fantastic 3D detail in your images. In this tip we're going to show you various 3D effects applied to a simple button, using just the Lighting Effects filter and channels.
A lot of these effects can be achieved using the "Effects" options in Photoshop 5 or the "Layer Styles" options in Photoshop 6, but it's still worth knowing the theory behind them, and this tutorial has lots of other goodies in too, so read on!
Lighting Effects - a primer
If you are fairly familiar with the Lighting Effects filter, you might want to skip this section.
Here we see the default Lighting Effects dialog (get there by selecting Filter > Render > Lighting Effects):
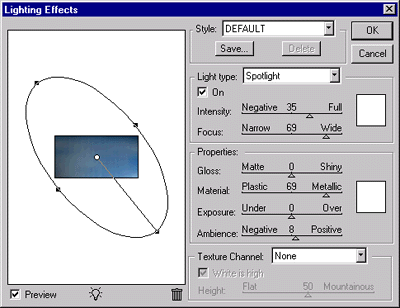
On the left hand side you can see a preview of your image with the current Lighting Effect applied to it. The dot in the centre is a light, and the ellipse around it marks the area affected by that light. You can drag that light to where you want it using the mouse. Drag a second light onto the scene by dragging the light bulb icon at the bottom. Remove a light by dragging it to the trashcan.
On the right hand side are all the settings for the filter. These are described below.
Style: This is a list of preset settings. Click a preset to bring the settings up in the dialog. You can save your own settings to a new preset by clicking the Save button and typing a name. The presets are stored in Adobe\Photoshop\Plugins\Filters\LtStyles\.
Light type: There are three types of lights you can place in the scene. Directional is parallel light, as if from a far away source such as the sun. This gives a completely even lighting effect. Omni gives the effect of the light being directly overhead, creating a circular beam, while a Spotlight comes in from the side, casting an elliptical beam.
Intensity: The brightness of the light.
Focus: Controls how wide or narrow the beam is (spotlights only!).
Gloss: How much light is reflected by the "surface" of your image. Matte produces low reflections; Shiny produces maximum reflections.
Material: How much reflected light comes from the colour of the light source, and how much from the colour of the "surface". Plastic reflects all the light's colour, while Metallic reflects all the "surface" colour.
Exposure: The overall brightness of the effect.
Ambience: How much ambient light contributes to the scene. -100 means all ambient light (no light sources); +100 means no ambient light (just the light sources).
Texture Channel: This is where all the fun is. Here you can define a texture map (sometimes called a bump map) to create a 3D lighting effect. To do this, you create a channel with your bump map, then select that channel from this box. You can swap the high and low points (hills and valleys) in your bump map by toggling the White is high box, and vary the heights of the hills and valleys using the Height slider. Simple!
Light Colours: By clicking in the white squares on the right of the dialog, you can choose the colours for each of your lights (top) and for the ambient light (bottom).
Let the fun begin!
Now that you know how to use Lighting Effects, let's start making some 3D buttons! Make a new image and fill the background with a colour - or just grab this example JPEG and open it in Photoshop:

Make a new layer and draw a circular selection from the centre of the image (hold down Shift and Alt (Option) to draw a circle from the centre). Fill the circle with your favourite colour!

Now we'll make a channel based on this circle, which we will use as a texture map in the Lighting Effects filter. Ctrl+click the layer in the Layers palette to select the circle (if not already selected). Now to soften the 3D effect, feather the selection a bit. Go to Select > Feather... and enter a radius of 3 pixels. Now we make this selection into a channel. Go to Select > Save Selection... and click OK in the Save Selection dialog (make sure New Channel is selected). Now deselect with Ctrl+D.
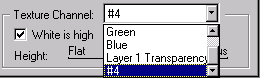
Open the Lighting Effects dialog (Filter > Render > Lighting Effects). Make sure the DEFAULT style is selected. From the Texture Channel box select the last item - if this is the first channel you've made, it will probably say "#4":
Take a peek at the preview on the left. Wow, your button is now 3D! Experiment with different positions and orientations of the light, and different settings, till you get the effect you want. To add to the 3D effect we've placed a drop shadow under the button:

3D text!
Let's try some 3D lettering on the button. Ctrl+click your new layer in the Layers palette to reselect the circle. Fill it again with your favourite colour.
Choose Select > Save Selection... and click OK in the "Save Selection" dialog (make sure New Channel is selected). Now deselect with Ctrl+D.
This should make a new channel - probably called "#5". We didn't feather the selection this time, but that's OK, as we're going to blur the channel later to soften the Lighting Effect.
Click on the Channels tab in the Layers palette to get to the Channels palette. There's your new channel at the bottom. Click on it and it will appear in the document window as a white circle on black.
Now use the Text tool to place some black text on the channel (make sure the foreground colour is black beforehand!). Press Ctrl+D when you've finished to deselect:

Now we blur the channel to make the Lighting Effect smoother. Go to Filter > Blur > Gaussian Blur... and select a radius of 2 pixels. Click OK.
Great! Now click on the RGB channel, then on the Layers tab, to return to normal editing mode. Go to the Lighting Effects filter and pick your new channel (probably called "#5") from the Texture Channel box. Now your button has 3D text carved into it!
More 3D Fun!
Of course, you can use your new channel as a texture map for anything, not just your button! Here the Lighting Effects filter is applied to the background, using the same texture map:

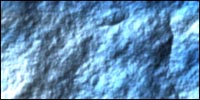
You can use all sorts of images as bump maps. Just select your image, copy it, make a new channel in the Channels palette, and paste your image into it (it will appear as greyscale, of course). Here we see the Clouds filter used to make a channel, which is then used to apply Lighting Effects to our background for a "lunar landscape" effect:
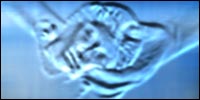
And here we have the Hands.jpg sample file that came with Photoshop, turned into a bump map - spooky!
No comments:
Post a Comment